Overview
 The Table Difference Component is an SSIS Data Flow Component designed to find differences between two tables and, in particular, to simplify the management of slowly changing dimensions. The main advantage over the Microsoft standard SCD component is the speed and ease of use.
One question arising very often in Data Warehouse programming is "What are the differences between two tables?" You have several million customers and need to decide what changes should be made. The standard SSIS toolkit provides the SCD component for handling this process, but it is of no practical use when you have to handle more than a couple thousand records. The Table Difference Component is not limited by the number of records to be processed.
This component has two inputs: one for "old data" and one for "new data". The old and new rows are compared and the result is sent to different outputs:
- Unchanged rows (same in both old and new)
- Deleted rows (appear in old but not in new)
- New rows (appear in new but not in old)
- Updated rows (appear in both old and new, but there are changes)
- Diagnostic Log 2.0
The diagram below illustrates the component functionality:
 Occasionally, you may have a requirement to perform different updates for different columns. The component includes an option to tag each input column with an identifier. Then, for each unique identifier, a separate update output can be created and maintained. Using this capability, you can tag the historical attributes with "10" and tag the other columns with "20" and decide what kind of operation to perform for the different updates, thereby providing maximum flexibility.
The component inputs MUST be sorted and have a collection of fields (keys) that let the component decide when two rows from the different inputs represent the same row. This is easily accomplished in SQL with a simple order by and a convenient index. Usually, slowly changing dimensions maintain an index by the business key, so the sorting requirement is easily accomplished and does not represent a problem.
Benchmark
This component was tested with 5.5 million records and 25 comparison columns on a dual core AMD machine with 4GB of RAM and a standard SATA disk. The comparison process was complete in 7 minutes. The complexity of the algorithm is linear, so you can expect 10 million records to be processed in approximately 15 minutes with the same hardware.

Demonstration
Quick Start
Requirements
NOTE: In order to complete this task you must have access to a Microsoft SQL Server instance which is used to store the sample data.
Create Source and Destination Connections
Before we can begin to setup the source and destination components, we will need to create two Connection Managers. Since our source and target is a SQL Server database, we will use OLE DB Connection for both Connection Managers.
- Right-Click in the Connection Manager and Select New OLE DB Connection from the pop-up menu option.
- When the Configure OLE DB Connection Manager dialog appears, Click the New button.
- Once the Connection Manager dialog appears, Type or Select the Server Name.

- Then, Select the Database Name and Test Connection.
- Click the Ok button to create the Source Connection.
- Repeat steps 2 through 5 for the Destination Connection.
- After the Source and Destination Connections have been created, rename them to SQLSourceConn and SQLTargetConn (See Figure-02).

Setup Data Flow – OLE DB Source Component (New Data)
The Table Difference Component requires two sources of input in order to carry out the comparison. In this section will configure an OLE DB Source Component for the new data, which will be used to compare against the existing data in the destination table.
- Drag and drop the Data Flow Task Plus from the SSIS Toolbox to the design surface.
-
Right-Click on the component and Select Rename from the Option Menu.
Note: rename the Task component accordingly (e.g., Load Table Customer_DIM).

- From the SSIS menu, Click on Variables.
- When the Variables window appears, Click the Add Variable icon.
- Rename the variable to gsSrcTableName.
- Set the Scope of the variable to the package.
- Set the Data Type to String.
- For the Value of the variable, enter in the text box dbo.src_icustomer.
-
Repeat step 4 through 8 for the remaining variables.
Note: for the variable gsSqlStatement , the Value will be set by the Expression property.

- Click on the Data Flow Task and then Click the Data Flow tab.
- Add the OLE DB Source Component from the SSIS Toolbox by dragging the component to the design surface (See Figure-05).

- Double-Click on the OLE DB Source
- When the OLE DB Source Editor window appears, set the following properties accordingly (See Figure-06):
| Property | Value |
|---|---|
| OLE DB connection manager: | SQLTargetConn |
| Data access mode: | SQL command from variable |
| Variable name: | User::gsSqlStatement |

-
Click on the Columns page to map the External Columns to the Output Columns (See Figure-07).
Note: uncheck the check box to remove unwanted columns from the External source. To set the order of the columns, first clear the selected columns in the table and then selecting external columns from the list in a different order.

Setup Data Flow – JavaScript Component
- Add the JavaScript Component from the SSIS Toolbox by dragging the component to the design surface.
- When the Select Script Component Type dialog appears, Select Transformation.
-
Drag the connector arrow from OLE DB Source to the JavaScript Component (See Figure-08).
Note: the JavaScript Component is used to generate a hashing key based on a number of columns selected. The hashing key is then used in the Table Difference Component to identify new and updated records.

- Double-Click on the JavaScript Component to open the Editor.
-
Click on the icon on the button left corner to import the JavaScript code from file (See Figure-09).
Note: if you have not yet downloaded the file that contains the JavaScript code for generating the hashing key, you can from this link.

- Locate and Click the text file, Checksum_Transformation.js, that contains the Java code.
- Click on the Open button to import the Java code.

- On the Parameters tab, Click the Drop-down Arrow to the right of the InputColumns to display the list.
- Click on the All button to select all columns available (See Figure-11).
- Click on the OK button.

Setup Data Flow – OLE DB Source Component (Old Data)
- Add the OLE DB Source Component from the SSIS Toolbox by dragging the component to the design surface (See Figure-12).
- Double-Click on the OLE DB Source Component to open the OLE DB Source Editor.
- When the OLE DB Source Editor window appears, set the following properties accordingly:
| Property | Value |
|---|---|
| OLE DB connection manager: | SQLTargetConn |
| Data access mode: | Table name or view name variable |
| Variable name: | User:gsTrgTableName |

- Click on the Columns page to map the External Columns to the Output Columns (See Figure-13).
Note: uncheck the check box to remove unwanted columns from the External source. To set the order of the columns, first clear the selected columns in the table and then selecting external columns from the list in a different order.

Setup Data Flow – Data Conversion Transformation
In this section we will use the Data Conversion Tranformation to rename the output column (e.g., Checksum) name of the JavaScript Component. Note: in order for the Table Difference Component to execute successfully the input column names and data type must match.
- Add the Data Conversion Transformation from the SSIS Toolbox by dragging the component to the design surface.
- Drag the connector arrow from JavaScript Component to the Data Conversion Transformation.
- Double-Click on the Data Conversion Transformation to open the Editor.
- Uncheck all columns from the Available Input Columns list except for the Checksum column.
- Name the Output Alias to DWHHashingKey, ensure the Data Type is string [DT_STR], and length is 66 (See Figure-14).
- Then Click on the OK button to exit the Editor.

Setup Data Flow – Sort Transformation
In this section we will set up the Sort Tranformation to sort the input columns for the New Data prior to executing the Table Difference Component. Note: sorting of the input columns is a requirement.
- Add the Sort Transformation from the SSIS Toolbox by dragging the component to the design surface.
- Drag the connector arrow from Data Conversion Transformation to the Sort Transformation (See Figure-15).
- Double-Click on the Sort Transformation to open the Editor.
- Uncheck all columns from the Available Input Columns list except for the CustomerNaturalKey column (**See Figure-16).
- Then Click on the OK button to exit the Editor.
- Repeat steps 1 through 5 for the Old Data.


Setup Data Flow – Table Difference
In this section we will set up the Table Difference Component to analyze the old and new data. If the input column names and data types match, the input columns will be added to the list of available columns to manage. The input column(s) designated as the key fields must be sorted and marked as key fields. Most importantly, the sort order must be specified. All other non-key columns are assigned as standard Update ID 10 and are managed as comparable columns unless you specify otherwise.
- Add the Table Difference Component from the SSIS Toolbox by dragging the component to the design surface.
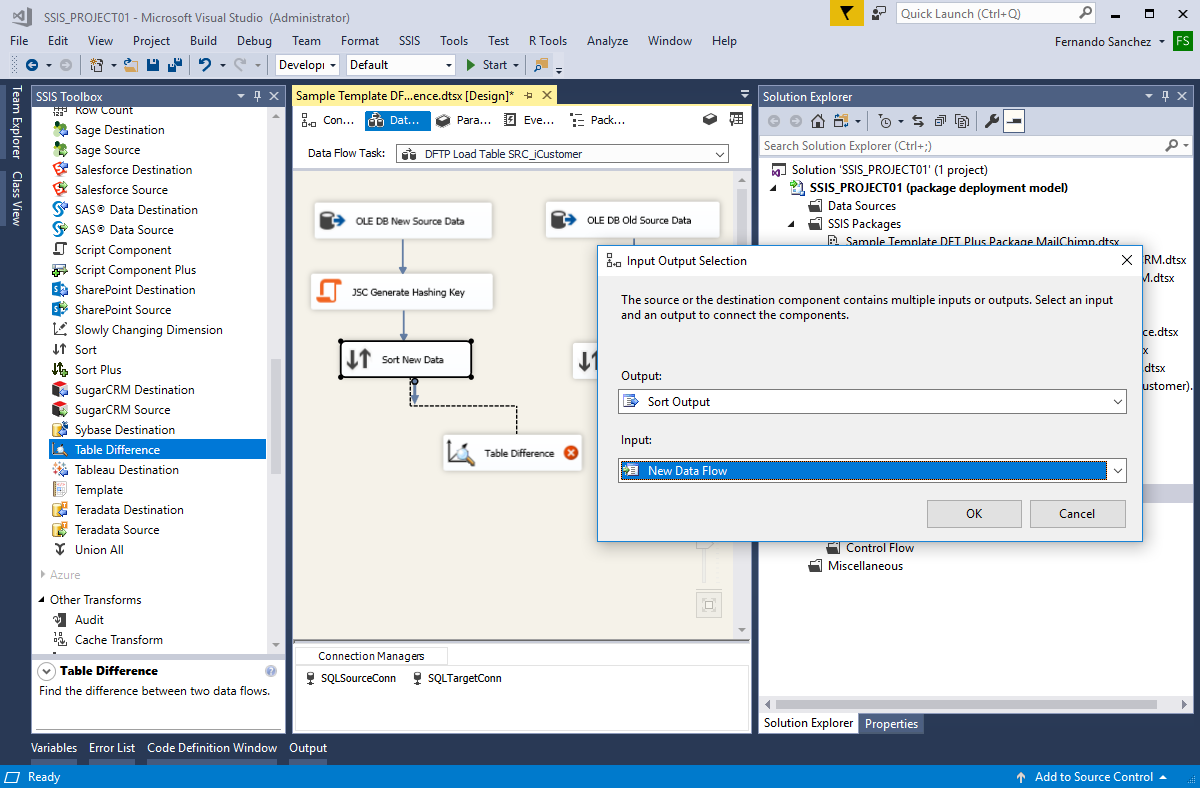
- Drag the connector arrow from Sort Transformation called Sort New Data to the Table Difference Component.
- When the Input Output Selection window appears, Select New Data Flow for Input (See Figure-17).
- Drag the connector arrow from Sort Transformation called Sort Old Data to the Table Difference Component (See Figure-18).

- Double-Click on the Table Difference Component to open the Editor.
- Set the Check value of the Input Column called CustomerNaturalKey to Key Field, KeyOrder to 1, and Upd.ID to 0.
- Set the Check value of the Input Column called DWHHashingKey to Compare, KeyOrder to 0, and Upd.ID to 10.
- Set the Check value of the remaining Input Column(s) to Use New, KeyOrder to 0, and Upd.ID to 10 (See Figure-19).
- Click on the Output tab and for the Output Name check the New and Update ID 10 (See Figure-20).
-
Click on the OK button to complete the configuration of the component.
Note: the biggest benefit of adding the hashing key to the data flow, it reduces the number columns to compare and performance is improved.


Setup Data Flow – OLE DB Destination & OLE DB Command
In this last section we will set up an OLE DB Destination to insert the New data into the destination table. Although the OLE DB Destination has a SQL Command for the Data access mode, it does not support parameters. For this reason we will use the OLE DB Command to perform an update on the Old data.
- Add the OLE DB Destinationt from the SSIS Toolbox by dragging the component to the design surface.
- Drag the connector arrow from Table Difference Component to the OLE DB Destination.
- Double-Click on the OLE DB Destination to open the Editor.
- When the OLE DB Destination Editor window appears, set the following properties accordingly (See Figure-22):
| Property | Value |
|---|---|
| OLE DB connection manager: | SQLTargetConn |
| Data access mode: | Table name or view name variable |
| Variable name: | User:gsTrgTableName |
- Click on the Mappings page to map the Input Columns to the Destination Columns (See Figure-23).
- When done, Click on the OK button to complete the configuration.


- Add the OLE DB Command from the SSIS Toolbox by dragging the component to the design surface.
- Drag the connector arrow from Table Difference Component to the OLE DB Command.
- Double-Click on the OLE DB Command to open the Advanced Editor.
- Set the Connection Manager to SQLTargetConn, which we created earlier (See Figure-25).

- Click on the Component Properties tab and Click the ellipsis button (...) in the SqlCommand box.
-
Copy and paste the following SQL statement in the String Value Editor and then Click on the OK button.
UPDATE Customer_Dim
         SET DWHHashingKey = ?
                ,EmailAddress  = ?
                ,FirstName     = ?
                ,LastName      = ?
                ,MiddleName    = ?
                ,Suffix        = ?
                ,Title         = ?
   WHERE CustomerNaturalKey = ?`

- Click on the Refresh button in order for the transformation to create a column for each parameter in the External Columns collection and sets the DBParamInfoFlags property.
- Click on the Column Mappings tab and map the columns in the list of Available Input Columns to the parameters in the list of Available Destination Columns (See Figure-27).
- Click on the OK button.
- From the File menu, Click Save to save the package.

Executing the Package
- To run the package, Click on the Start button on the Menu bar, or press F5 key (See Figure-28).
-
After the package finishes running, press Shift+F5 to return to design mode.
Note: if each step in the Data Flow executes successfully, a Green check will be displayed next to the step (See Figure-29). When the package initially executes all of the records will be inserted into the destination table. In order for the OLE DB Command to execute, several records will need to be updated in the source table and the package will need to be executed again (See Figure-30).


Summary
In this Quick Start article, we have shown you How-To create an SSIS package that performs a comparison between two data sets using the COZYROC Table Difference Component to load a Slowly Changing Dimension table with new and updated records. In addition to using the COZYROC Table Difference Component, we included the JavaScript Component, which was used to generate a hashing value, to simplify the comparison between the two data sets. The use of a hashing value is commonly used in a data warehouse ETL process in detecting data changes when loading a Slowly Changing Dimension table.
Case Study
Parameters
The Input
The component has two inputs:
- Old Data Flow - attached to source returning existing rows.
- New Data Flow - attached to source returning new rows.
Each input has a buffer where all incoming rows are directed and maintained. A separate thread starts as soon as data from both buffers is available and checks for any differences between them. The rows are sent to the appropriate output and then removed from the buffers. The component does not need to maintain all the data in memory. The data is removed as soon as it has been compared with the corresponding row. For some obscure reason, SSIS allocates more processing time to one of the input data flows, compared to the other. This results in additional memory consumption by the component. For this reason, if you need to compare more than half a million records, we recommend you use the COZYROC Flow Synchronization component in your data flow.
The Output
The component has three standard outputs for New, Deleted, Unchanged and Diagnostic Log 2.0 rows. For each unique user-defined UpdateID identifier, a separate Updated row output is created. The outputs related to the UpdateIDs are named "UpdateID", followed by the identifier (e.g.UpdateID10).
You can easily change the name of the Update output to something more descriptive like "Updated historical attribute" and we encourage you to do so. The collection of output fields is computed by the component-based upon the intersection of the two inputs. If one column appears in only one input, it is not considered. If it appears in both, then it will be processed.
Input Setup
The component analyzes the old and new columns. If the column name and type match, it is added to the list of available columns to manage. The inputs must be sorted. Their sort columns must be marked as key fields and the sort order must be specified. All other non-key columns are assigned a standard Update ID 10 and are managed as comparable columns unless you specify otherwise.

Select the input column processing type. This parameter has the options listed in the following table.
Value Description Key Field Use this column to determine which rows from the old and new input tables represent the same data. The inputs must be sorted by this column. Compare The column from the new and old rows will be compared to detect any difference. Use New The column will be copied from the New Data Flow input to the output without comparing the contents. Use Old The column will be copied from the Old Data Flow input to the output without comparing the contents. Specify the "Key Field" column order. This is the order in the query's "Order By" clause. The component does not know the correct order, so it is up to you to provide this information.
Specify the column update identifier. For each unique identifier, a separate update output is created. The update identifier with the lowest value has the highest priority. For example, assume we assign the AccountNumber column the update identifier of 10 and we assign the AddressLine1 column the update identifier of 20. If AccountNumber is different, the row will be directed to the update output 10, even if AddressLine1 also contains a difference.
Outputs Setup
Specify a name and description for each desired output. If you are not interested in Unchanged output, then you can deselect it and avoid warnings for unused columns.

Output columns
Specify output column options.
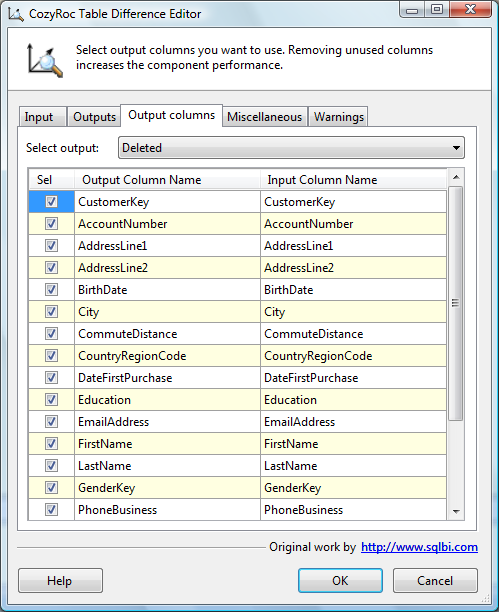
Select the output for which you want to edit column selection and/or names.
Select or deselect the output column. Deselecting unused columns removes warnings and increases the performance of the component.
Specify a custom output column name.
Miscellaneous
Specify options for string comparison and whether to include extra columns in the Diagnostic Log 2.0.
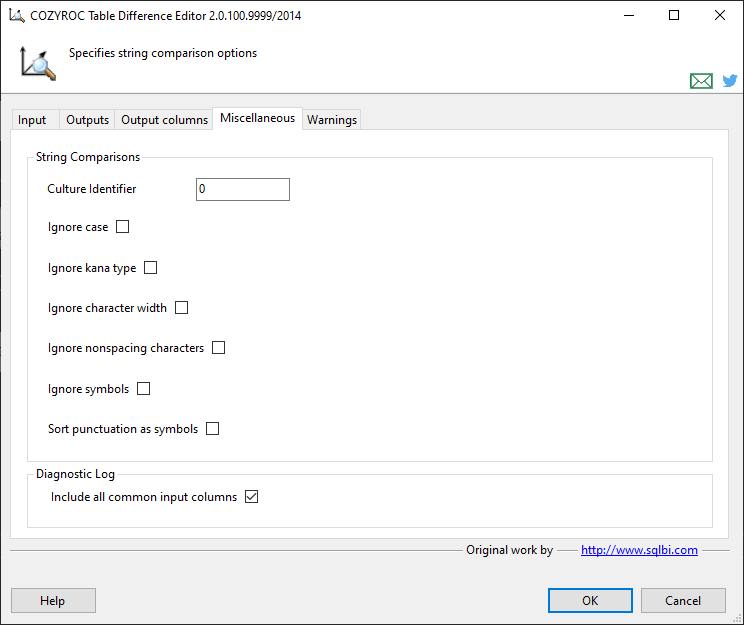
Specify the culture used to perform the comparison. If not specified, the component will use the culture of the running task.
Indicate that the case should be ignored for the comparison.
Indicate that the Kana type should be ignored for the comparison. The Kana type refers to Japanese hiragana and katakana characters, which represent phonetic sounds in the Japanese language.
Indicate that the character width should be ignored for the comparison.
Indicate that non-spacing combining characters, such as diacritics, should be ignored for the comparison.
Indicate that symbols, such as white-space characters, punctuation, currency symbols, the percent sign, mathematical symbols, the ampersand, and so on, should be ignored for the comparison.
Indicate that the string sort algorithm should be used, where the hyphen and the apostrophe, as well as other non-alphanumeric symbols, come before alphanumeric characters.
If checked, the Diagnostic Log Output would include also all columns that are common for both inputs. E.g. if there is a common column
col, there wouldOLD_colandNEW_colcolumns in the Diagnostic Log output.
Warnings
This tab will contain all unused input columns. By checking the warnings you can see if the component is working with all the desired columns.
Knowledge Base
- Why are the input columns not showing in Table Difference?
- Where can I find the documentation for the Table Difference?
- How can I dynamically modify a transformation in an SSIS Data Flow Task?
What's New
- Fixed: Failed to process when used in Data Flow Task Plus.
- Fixed: Corrected diagnostic log to provide all columns modifications, not just the first modified column (Thank you, Colette).
- New: A new 'Diagnostic Log' output to analyze the differences on a more granular level.
- Fixed: Columns grid content became mangled when attempting to save the configuration.
- Fixed: Component incorrectly transformed NULL value input into empty string, when input column type was DT_TEXT or DT_NTEXT (Thank you, Michael).
- Fixed: Component failed with "COM object that has been separated from its underlying RCW cannot be used." error when processing input columns of type DT_TEXT or DT_NTEXT (Thank you, Michael).
- Fixed: Improved setup dialog loading speed, when using many columns.
- Fixed: Component was dependent on .NET 3.5 framework after the new string comparison options were introduced. The component now requires only .NET 2.0 framework.
- New: Component now includes more options for string comparison (Thank you, Shane).
- Fixed: Failed to process DT_DBTIME2 column types in SQL Server 2008 (Thank you, Ethan).
- New: Introduced component.
Related documentation

COZYROC SSIS+ Components Suite is free for testing in your development environment.
A licensed version can be deployed on-premises, on Azure-SSIS IR and on COZYROC Cloud.